
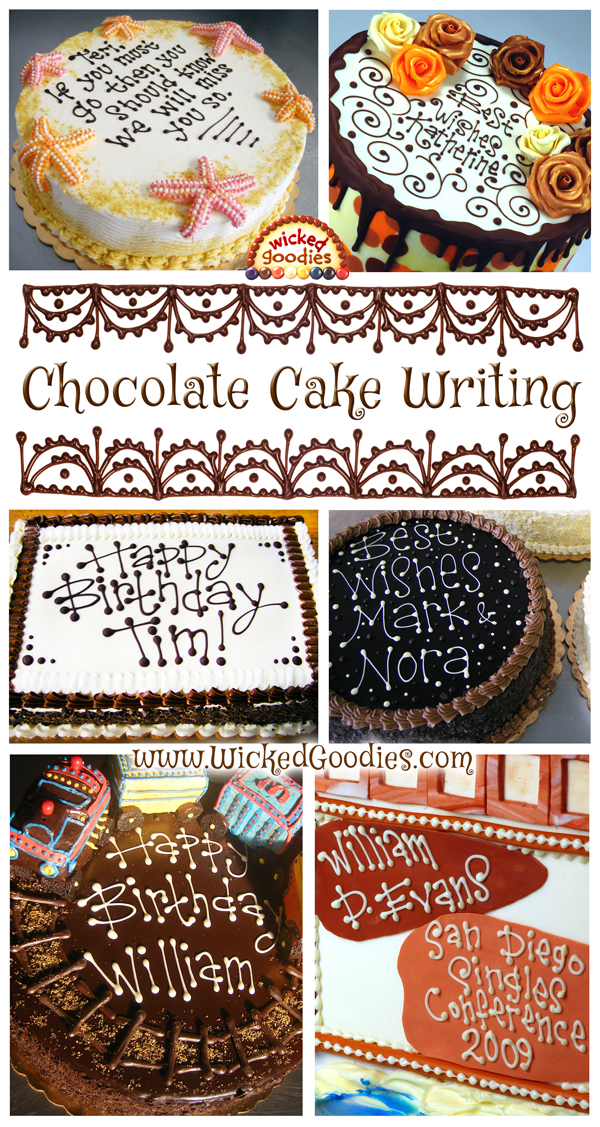
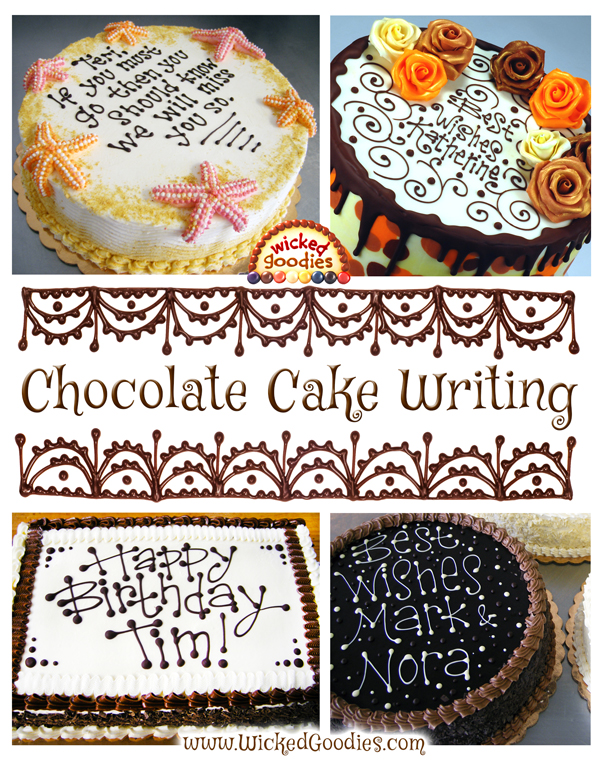
The Benefits to Writing with Chocolate
Writing with melted chocolate looks classier and more legible than frosting. Genuine chocolate works best since it has a thinner, smoother pour due to its higher cocoa butter content.
First, Check the Spelling & Grammar
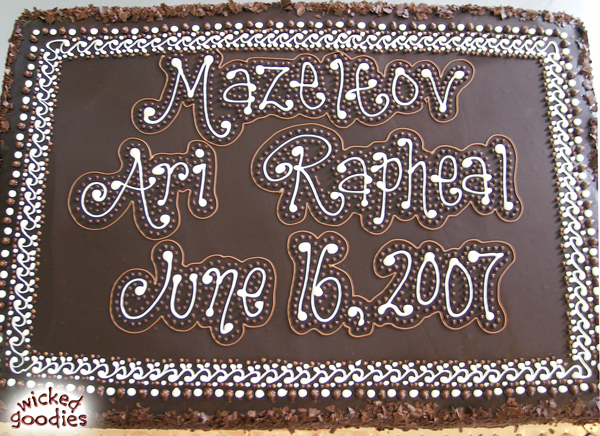
Before beginning to pipe, always remember to check and double check spelling before committing to cake writing (Mazel tov is two words not one).
Incorporating the Inscription Into the Design
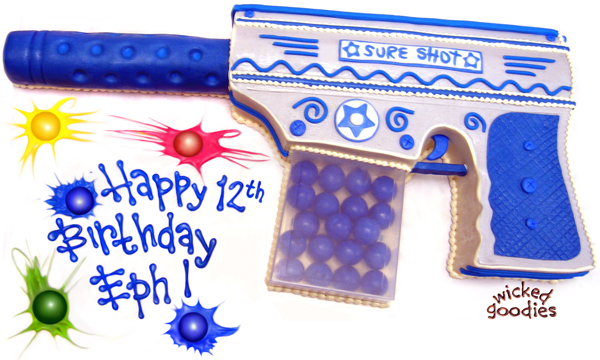
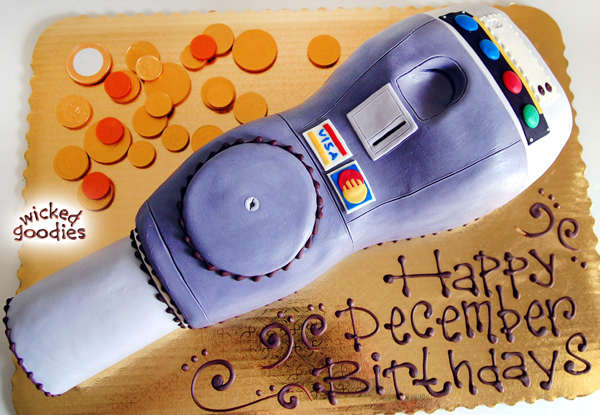
Consider incorporating the written inscription into the cake design, like in the example of the paintball gun cake featured above. The “i” in the word word Birthday and the dot on the exclamation point are made from gumballs in splattered pools of colored chocolate, designed to look like paintballs.
Recipe for Writing Chocolate
- ¼ cup chips or chopped chocolate, melted
- ½-1 teaspoons of vegetable oil
Add vegetable oil, stirring with a small whisk, until a good writing consistency is achieved. The chocolate should be pourable but not drippy. This technique works best using a parchment paper cone.
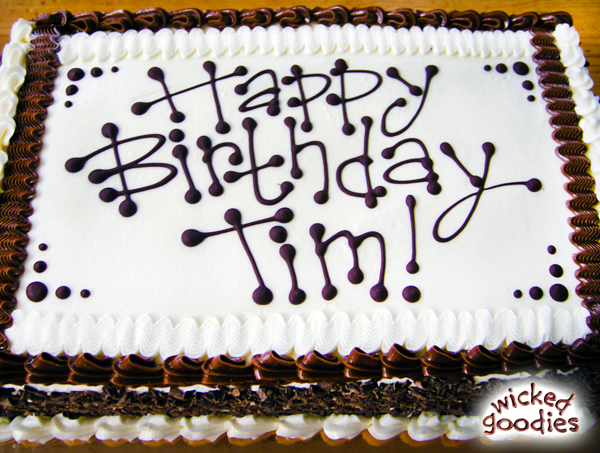
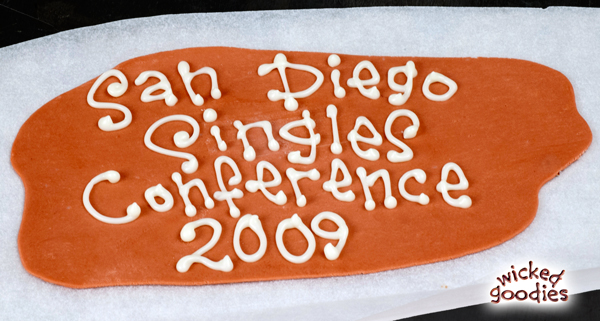
Wonky Style Font
I prefer to write with a deliberately wonky style font because it is the most forgiving of all cake writing fonts.
Download the FREE
Wonky Font Chocolate Cake Writing Templates

Bubble-ended letters are a playful look that helps make the start/stop points look like they’re done on purpose.
Writing on the Cake Platter
If there’s space, you can always write on the cake board. Mistakes can be scraped off and redone on a board.
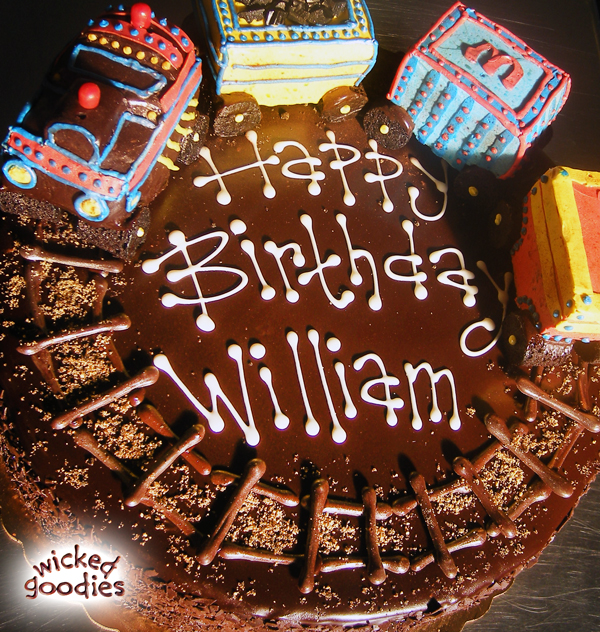
Oopsy! Accidentally Crammed Words
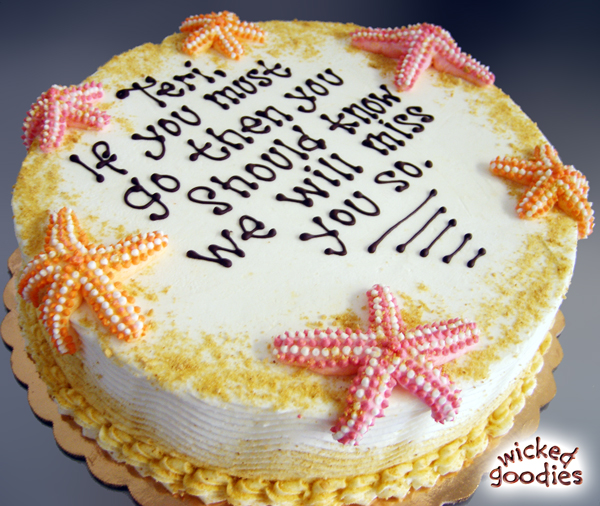
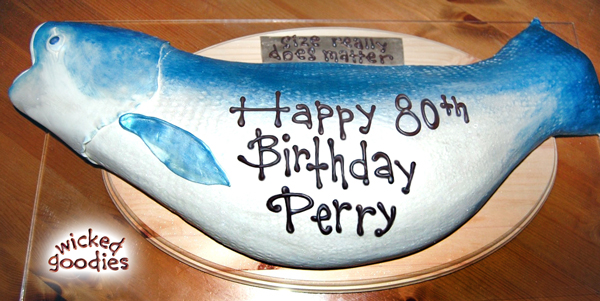
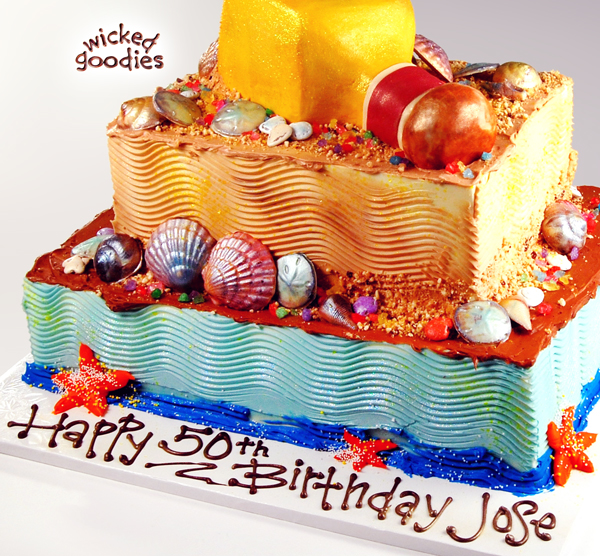
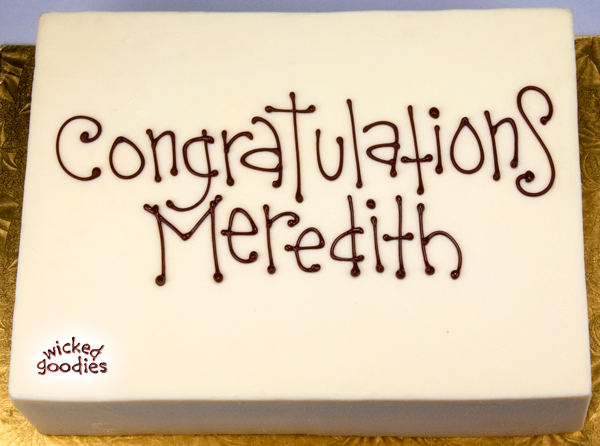
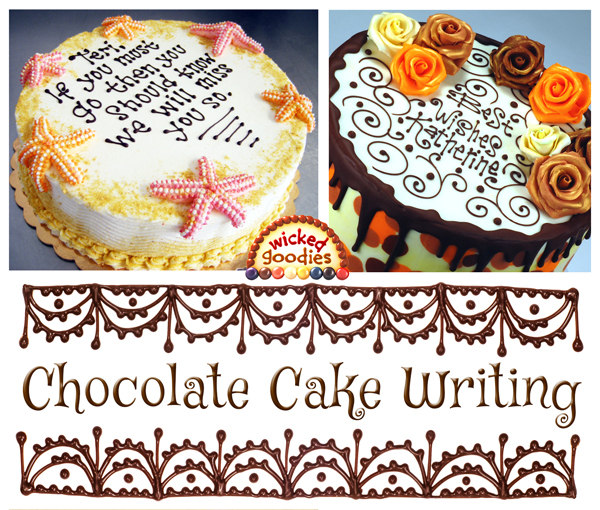
Writing blindly without a strategy may result in some words getting crammed against a starfish followed by an unexpected amount of extra space at the bottom of the cake, the solution to which is to underline the sentiment over and over and over and over and over and over again….or better yet, plan the placement of words in advance of writing. Take a shorter inscription, Congratulations Meredith, for example.
How to Center a Word
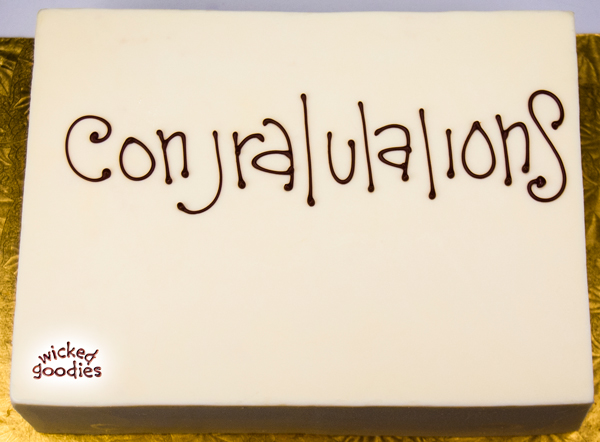
Congratulations, at 15 letters, is a toughy. It helps when writing long words in chocolate to refrain from dotting i’s and crossing t’s until the skeleton of the word is in place. Stopping to dot i’s and t’s breaks rhythm and is more likely to cause a misspelling, wobble, or drip.
Congratulations
To center long words horizontally on a cake, note where the true center of the word lies. In this case, tu marks the center point of Congratulations. So aim to reach the middle of the cake around tu. Sometimes I will write tulations first, starting in the middle of the cake then finish with Congratu by writing it from right to left. That technique ensures there will be enough room for the entire word.
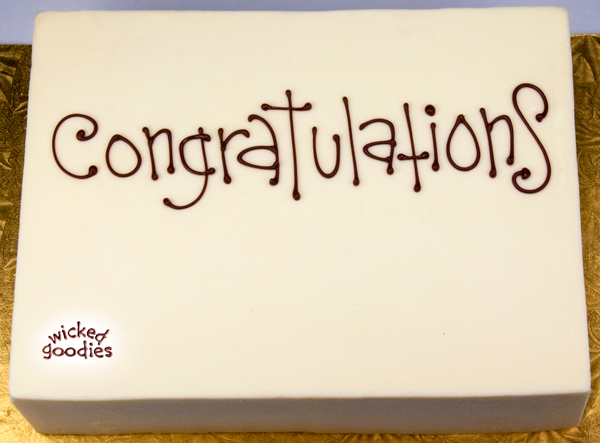
How to Center Two or More Words
To center two or more words on a cake, first, type the phrase into a word processing document (or you can do it in your head). Then, center justify the font and study the outcome.
Congratulations
Meredith
Note first how the words line up horizontally. Meredith is a shorter word than Congratulations so on the cake, Meredith should be tabbed in. Note that the M at the start of Meredith falls under the g in Congratulations so when it comes time to write Meredith, begin directly under that g.
Writing Inside Out
To achieve vertical symmetry, write words from the inside of the phrase out.
For example, for the 4-line inscription, Happy Birthday, Barbara & Jeff, begin by writing the center portion of the text, Birthday, Barbara.
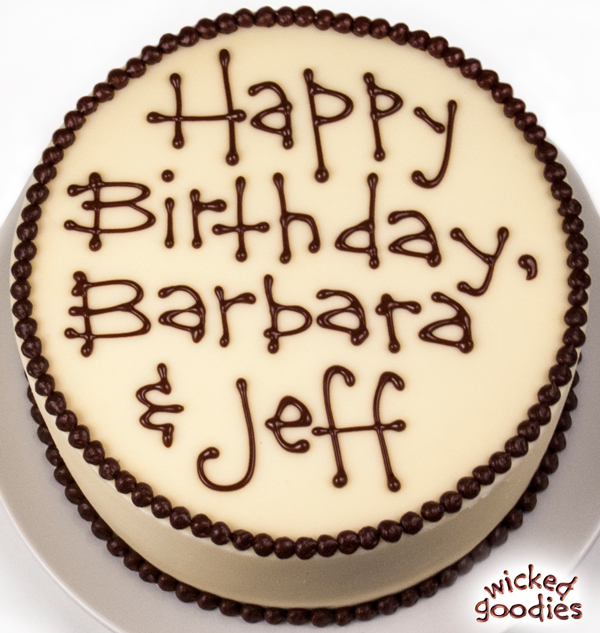
Then add the top and bottom elements. This method guarantees that the text will be evenly distributed vertically. More commonly, a cake reads Happy Birthday So-and-So with only one person’s name. In that case, begin by writing the word Birthday across the middle then finishing with Happy on top and So-and-So on the bottom. Here is the link to watch my Happy Birthday Cake Writing Video.
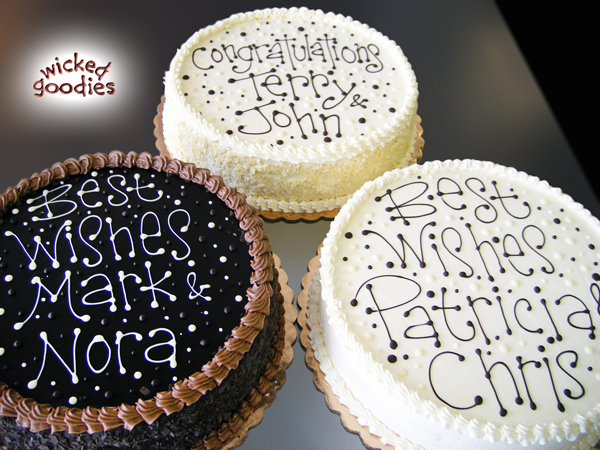
To distract the eye from flaws or asymmetry or to simply to enhance a cake’s face, fill the blank spaces around words with polka dots or swirls.
Trick for Piping Vertical Inscriptions
To include inscriptions on the vertical sides of cakes, roll out a 1/8” thick slab of fondant, modeling chocolate, or, marzipan.

Write on it, allow it to dry, then affix it to the side of the cake with a dot or two of buttercream.
Birthday Present Cake Tag
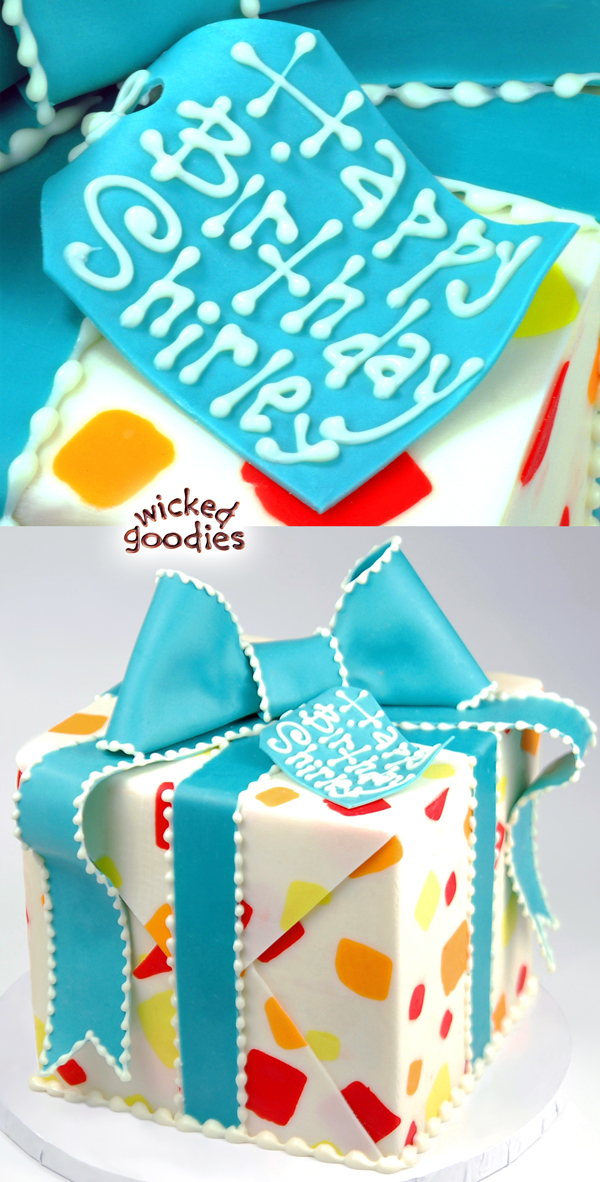
The benefit of using rolled modeling chocolate for plaques is that it can also be curved like this tag on a present cake. The plaque method is handy since it avoids writing directly on the surface of a cake. Make a mistake? No worries; just flip the plaque over and write on its back side or conceivably, write on as many plaques as it takes to get it right.
Practice Makes Perfect
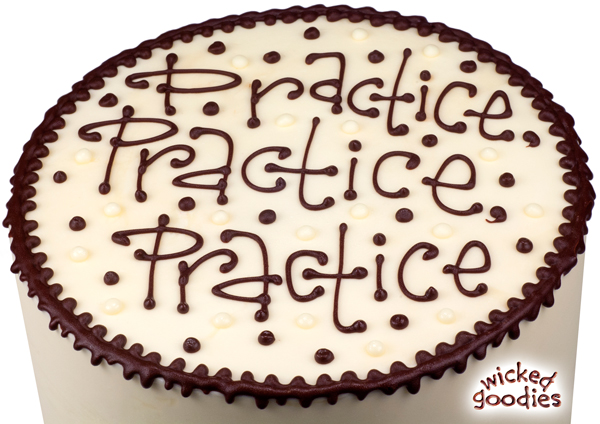
Last but not least, practice, practice, practice. Practice on parchment or wax paper. Get some chocolate and practice right now! Doodle away.

Brought to you by

Author of

New to Wicked Goodies? Start *HERE*


You might also enjoy
Piping with Parchment Paper Cones
 Chocolate Glaze Recipe
Smooth Buttercream Cake Frosting

Modeling Chocolate Resource Guide
Never thought of using Chocolate, great idea, now to practice my writing!!
Wow you’re so generous in sharing your knowledge. Thank so much for the great tips and information I’m learning a lot.
Hi there. Thank you for solving my predicament. I need to do an anniversary cake for our parish priest and i designed a stole with intricate artwork at the end. I was practicing with brushes and wilton tints, but i can’t get them to write finely. Your paper cone seems to be the best solution, so thank you again! my question is how to add gold to my while chocolate melt? Also can i use those Wilton Candy melts?
sorry, i meant white chocolate melts
I have had good luck brushing the gold dust directly onto chocolate once it is hard. For more precision, you can mix it with a little bit of vodka to make a paint, but I’ve found that the dry brush works fine. Here is an example where I painted dry gold dust onto white chocolate piped with a paper cone.
I don’t recommend adding gold dust to the chocolate itself. I suspect that it would take a lot to achieve a gold hue – so much that the chocolate would seize or clump. There may be some special candy color out there that is safe to add to chocolate but it’s probably expensive. Considering the design you have in mind, brushing is a good bet.
Yes, you can use candy melts.
Oh wow!! That’s was super awesome! Thanks so much Kristen for the advice.
Best of luck on your business and more power to you.
What a beautiful cake — it’s inspired!
Awesome Cakes! Been trying to learn how to bake cake this year, and I so appreciate all the tips you’ve mentioned here! Thanks!!!!
How can i write on adobe photoshop choklates writing?
Babar,
You can print out a paper copy of the writing from the Photoshop program then slip it under a piece of wax paper or parchment paper that is taped down to the underside of a sheet pan or cookie pan. Use the printout as a guide to pipe the melted chocolate onto the paper. Make extra copies of each letter as they have a tendency to crack when being handled. Allow the chocolate letters to set then transfer them delicately onto the cake using a small offset spatula. Cracked letters can still be pieced together once on the cake. This technique works well for piping monograms, large letters/numbers, and unique fonts.
Hi..
Plz suggest how much time I need to keep the chocolate letters in the freezer.. they are breaking before keeping them on the cake.. PL suggest something to overcome that.. thanks
1) Only as long as it takes for them to get firm (5 minutes tops)
2) Once they are firm, pick them off using a cold offset spatula. Don’t use your hands.
3) Always make extra, just in case they break.
4) Don’t make them too thin.
I’m really looking forward to ordering your book? Do you include demos/info on cake structure in the book?
Hi Mal,
Yes, the modeling chocolate book gets into demonstration of carving 3D cake parts and more advanced engineering methods. There is also a lot of info here on my blog that compliments the material within the book. Check out the Cake Construction category. It’s full of tips.
Love your book:) I made lots of modeling chocolate colors. Now the fun begins.
Great, Holly! Have fun, come back and share a pic of your work with modeling chocolate. We’d love to see what you come up with. Feel free to email me if you have any questions. – Kristen
Your information is the best that I have found. Thank you so much!
This is the best writing instructions I have come across. Thank you, thank you!
I need to make some chocolate writing for cupcakes for a friends wedding. I just wondered what you suggest as for storage and how far in advance can I do it? love your tutorials! Thanks
I’ve never done chocolate writing in advance and then stored it because chocolate blooms over time unless you temper it. You could always make some fondant, marzipan, or modeling chocolate plaques out of cut-outs and then pipe the inscription onto those. However for lengthy storage, royal icing would be better.
Thank you so much! This helps me a lot.
A great cheat for beginners: on a piece of paper, write out the full-size text. Flip it over and trace the backside so that the text is backwards. Trace the backwards side using a hot glue gun. When the glue has dried, you can press the design onto the frosted cake, making an imprint that you can trace.
This works for text, coloring book designs, or anything else that you are nervous about getting right on the cake!
Wow so cool! Thanks for sharing the idea 🙂
yum.i won’t tell you what our weather is supposed to be like for the rest of the week, but today was rainy, cold and a bit chilly . Love you. Miss you. Will call one of these days!!!
Thank you for the tutorial in writing. It has taken me a long time to learn to write on cakes. I believe practice makes the difference.
You seem to have a wide range of writing styles. Is there a book you would recommend to practice the different styles of penmanship?
Example: Script vs. Wonk
Hello and yes, I agree. Practice helps tremendously. I have been interested in the art of handwriting since I was a little kid. At some point, I had calligraphy pens and spent a lot of time practicing that. I got this book when I first became a cake decorator: Speedball Textbook by Joanne Fink (fyi they may have a newer addition available now). It doesn’t show how to do any of the writing styles. It just shows pages and pages of handwriting ideas. Nowadays many of those ideas are more readily available on your home computer as “fonts”. Maybe there are better books out there on this topic but I wouldn’t know, as I found that one to be sufficient. I flip through it now and can see how much it influenced the direction that I took with chocolate cake writing.
I never learned how to write cursive in school so I am not very good at it. I developed the wonky style out of a need to have an alternative. So if you’re already good at cursive, stick with that. Wonky style just happens to work well for people like me who are cursive-impaired.
I melted the chocolate quickly in the microwave, and I’m going to be doing the egg decorating in a shopping centre so the fridge isn’t an option. They’ve still not set solid overnight:(. I’ll try today without the oil and see if that makes a difference…
If you can find a good quality white chocolate, you may be able to do it without needing any oil. Then I would suggest melting the chocolate like this: melt half of the chocolate very gently, remove from the heat, then add the other half of chocolate and stir periodically over the course of a few minutes until all the chocolate is melted. If you do that, it should set up harder for you than if you melt all the chocolate together at once.
Help – I need to have this sorted by end of this month, aaagh!! I thought I had everything to a T – 100gs white chocolate, 1 tsp veg oil, perfect consistency, wrote beautifully on my chocolate Easter eggs…but it hasn’t dried. The writing is still gooey. I need to be able to package the eggs up after about 20 mins – what did i do wrong?
Cheers. Linda
Did you put them in the fridge? That ought to make it set up fast. Also, depending on how to you melt your chocolate, you can end up with very different results. So if you melt your chocolate very gently, it will keep its temper better and that will make it set up stronger but if it’s exposed to a lot of heat, that will ruin the temper altogether and it will never fully set up right again. Just a tip.
It’s better to melt the chocolate first so you can get a sense of its thickness before deciding how much oil to use. Technically, however, you could add the oil at any time.
I’ quite new with these writing techniques,and you did a very good tutorial too, but I wanted to ask if I got it right, should we melt the chocolate in a bowl with simmering water then if melted add the veggie oil or pour everything in the bowl then melt it?
I would wait to add the oil until the chocolate is melted. For you need to see the consistency of the melted chocolate before you know how much oil you need to add. When using high quality dark chocolate, I find that I often don’t have to use oil at all.
hello I need to do a cake with a paragraph on the vertical side of the cake… to look like a verse
any suggestions of tricks please – contemporary cursive
Cheers twisted.tastes
Vertical writing is the hardest kind of writing to do, but there are some tricks. First, it helps to work with a cake that’s covered in modeling chocolate or fondant, as those are easier surfaces to write on sideways than frosting or icing. It definitely helps to use a paper cone, which allows for more control of the wrist at that angle. For vertical writing, I use melted chocolate with a couple drops of water. The water seizes up the chocolate just enough to make it firm for sideways piping (so it doesn’t drip). It helps to press into the surface of the cake a little with the tip of the paper cone. You have to keep constant contact with the surface of the cake otherwise the chocolate can drip. I highly recommend decorating each tier separately before assembling the cakes if this is a stacked cake. Good luck!
vry NIce……..
gr8
Awsm./………….
thank you so much for the detailed tips.I wonder if we use the white cocolate the same way? and can we color it?
Yes you can use white chocolate and it can be colored with candy coloring.
Writing on cakes is something that always makes me VERY nervous! Your tips are superb… i can’t wait to try them out on my next cake that needs a message 🙂
Thanks for your help making a 30th birthday cake they want text I was panicking as my handwriting is terrible I am going to get practising and see how I go with your tips. I love your writing style and ideas. One question is can I write it and set the letters on parchment and move them over it does it not look as good that way?
Yes you can do that! It works great for things like monograms if you want to put them on the side of the cake but it’s also good if you want to make sure that you get it looking right before it goes on the cake. I suggest piping onto a piece of parchment paper that is taped to an inverted half sheet pan and using the fridge or freezer to get the pan and the letters cold enough to move. It helps to use a small offset spatula or pair of tweezers to move letters around back and forth. Be prepared for the chocolate to crack. I would suggest writing your phrase 2-3 times over so that you have extra letters in case some crack. You can still used cracked ones if the pieces are placed flush together on the cake. One more thing: you will get better results from using a good quality chocolate and melting it very gently so that it holds some of its temper.
Love this tutorial. Your posts are always so detailed and such a great help! I would love to see another chocolate one with your over-the-top of the cake drip technique, it makes my mouth-water through my eyes!
Here you go. This is a hazelnut dacquoise cake with that drippy chocolate technique 🙂
who’s baaaarbra?
gr8 m8 😀 😉
wow great name!
let’s swap numbers!
goodbye wicked goodies
until next time!
thank u
dear lonely puddles,
you are awesome!!!!
can i have your autograph?
no
yes
wow, cool, amazing, awesome! i like pineapples and pizza and gelato. Do you ms. wicked goodies? don’t say cooking! 🙂
Hi there
Do you use a piping bag filled with the choc mixture to write on the cakes?
I use parchment paper cones.
What do you use to write with?
melted chocolate mixed with a little vegetable oil
Hello, can I just trace the works I want on a parchment paper using choc. and when it becomes hard (maybe put them in fridge?) can I directly place them on the cake? – is it doable?
Thanks for your tips!
Yes – that trick works great for adding monograms to wedding cakes and inscriptions to the sides of cakes. Letters like that are very prone to cracking though so I recommend piping 2 sets of the inscription so that backup is available. Also I would thin down the chocolate with melted cocoa butter instead of oil because the cocoa butter will help strengthen the chocolate (whereas oil will prevent it from fully setting up).
Where do you get cocoa butter from?
thanks for the tutorial( i actually didn’t feel i needed it), but i now see what i’ve been doing wrong, it all makes a lot of sense now. thanks
Thanks for sharing this. Never thought of using chocolate for writing but this looks way better than writing with frosting. I love your wonky style writing.
Thank you soooo much for the information and instructions on writing with chocolate ! It seems much simpler ( and I need all the help I can get as a cake-decorator-newbie ) They are all so beautiful !
Thank you so much for taking time for this lesson. While I can sculpt a standing yoda, writing on cakes is not something I enjoy or am proficient at so I am grateful for your sharing. 🙂
You do amazing work, Jennifer.