
THIS KIT IS NOW FREE!
Introduction
This dough recipe is one that I modified specifically for the use of gingerbread house building. I have engineered some fairly large competition pieces with it. Note that one big difference between this recipe and a conventional cookie recipe is that there’s no leavening agent such as baking soda or baking powder used here, because that causes shapes to rise and spread, which is not desired in the case of gingerbread house construction. Note also that the keys to making successful gingerbread house parts are more dependent on execution, less on recipe. Because gingerbread house pieces are large and often complicated by doors and windows, extra measures must be taken in the handling process. Therefore please read all of the instructions before attempting the recipe.
VIDEO: Dough Making – Gingerbread House Series
Click here for the printable Gingerbread House Dough Recipe
Equipment Needed
Here is a list of equipment that I recommend for gingerbread house baking. As an Amazon associate, I earn commission on qualifying purchases at no cost to you.
Stand Mixer

Gingerbread dough is robust so a strong stand mixer works best. I have used this robust stand mixer.
Rubber Spatula
Or any kind of bowl scraping tool.
Plastic Wrap

Plastic wrap is needed to keep the gingerbread dough fresh at all times.
Silicone Rolling Pin

I like the silicone Wilton rolling pin because it comes apart for easy cleaning.
Parchment Paper
I recommend full sheet Quilon coated parchment paper, which can be cut down to whatever size is needed.
Micro Roller Cutter

The rollers on this micro roller cutter are 1/2” and 1/4”. The 1/2” wheel is perfect for tracing around templates.
Mini Roller Cutter

This mini roller cutter (commission earned) is handy for all kinds of decorating projects including gingerbread house making.
Cookie Sheets

I recommend the rimless kind of baking sheet, for easy sliding on and off of gingerbread pieces.
Gingerbread House Dough Recipe
Makes enough for one 8” x 8” x 10” gingerbread house.
Bake in a 325°F (163 C°) oven
Click here for the printable Gingerbread House Dough Recipe
3 lbs (13.5 cups or 1.4 kg) sifted all-purpose flour
1 Tablespoon ground ginger
1 teaspoon ground cinnamon
1 teaspoon ground cloves
½ teaspoon salt
2 cups unsalted butter (1 lb or 465 grams) at room temp.
2 cups granulated sugar (14 oz or 390 grams)
2 eggs at room temp.
2 cups molasses (1.5 lbs, 710 grams, or 480 ml)
¼ cup white vinegar (60 ml)
Step-by-Step Instructions
- Sift together the dry ingredients and set them aside. (Note: this is the second time you will be sifting the flour)
- Cream the butter and sugar until light.
- Add the eggs slowly and mix on low until just combined.
- Add the molasses slowly and mix on low until just combined.
- Add 1/3 of the dry ingredients and mix until just combined.
- Scrape the bowl.
- Add the vinegar.
- Add the last 2/3 of the dry ingredients and mix well until no streaks of butter or molasses show.
- Scrape the bowl and continue mixing for another 30 seconds. The dough must be thoroughly combined in order to bake evenly. If there are any light or dark patches, then it’s not mixed well enough. Knead the dough a little if you have to at the end to achieve a 100% consistent
color throughout. Note: This gingerbread dough is soft and sticky when first mixed but once chilled, it becomes firm enough to roll thinly and cut accurately. - Divide the dough into four equal portions and seal them well in plastic wrap. Press the dough into flat, square shaped patties. Pile the patties on a flat surface and put them into the refrigerator for at least 24 hours to chill and relax. For longer storage, slip the wrapped patties into freezer bags. Gingerbread dough can be made well in advance and held for a week or more in the refrigerator. It can be held for a month or more in the freezer as long as it’s properly stored. Note: Each patty of dough, if rolled out thinly, can stretch the length of a full sheet pan. For home kitchens, I recommend cutting the patties in half before rolling them out to accommodate the smaller size of half sheet pans and home ovens.

Click here for the printable Gingerbread House Dough Recipe
Rolling & Cutting
VIDEO: Rolling & Cutting – Gingerbread House Series
Step-by-Step Rolling Instructions
1. Remove gingerbread house dough from the refrigerator and allow it to rest at room temperature for five minutes or until it’s just soft enough to yield to a rolling pin. Don’t let dough sit out for more than 20 minutes before rolling. When not in use, it should go right back into the refrigerator.
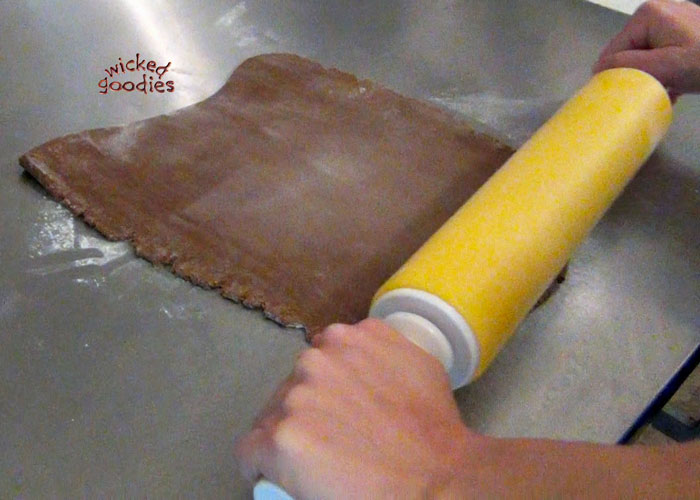
2. Remove the plastic wrap and brush the outside of the dough with flour.
3. Lightly flour the work surface as well and begin rolling out the dough with a rolling pin. Roll gently, pushing the dough in all four directions of a square. Make sure that the underside of the dough remains well-floured so that it doesn’t stick to the tabletop.
Troubleshooting at the Rolling Stage
- If the dough cracks apart at this stage, it may be too cold and needs to sit out a little bit longer until it’s softer.
- If dough rips, press it back together and continue rolling it. If it develops a hole, patch it with a chunk of dough
- If the dough becomes sticky while rolling, brush it lightly with more flour. Go lightly on the flour, however, as too much flour can dry out the dough and make it harder to fix cracks.
- If you’re having trouble achieving a flat even sheet of dough, try covering a partially rolled out piece of gingerbread with plastic wrap or a sheet of parchment paper. Some people find it more
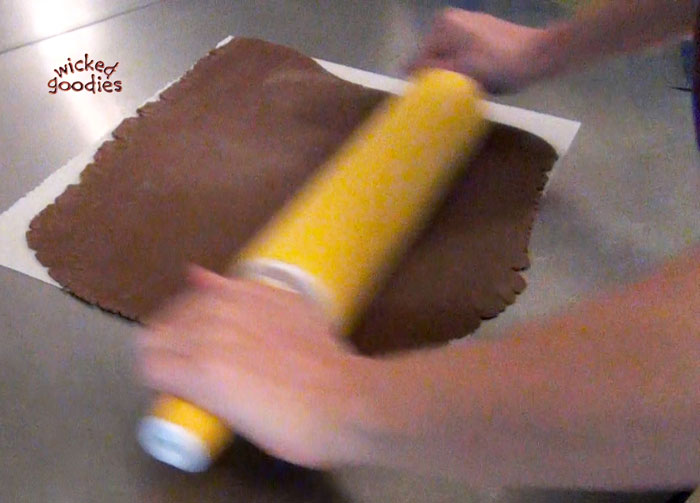
4. When the dough is roughly ¼-inch thick, slide it onto a sheet of parchment paper.
5. Continue rolling the dough on the parchment paper until 1/8-inch thick. If it gets sticky, brush it very conservatively with flour. It’s important that it doesn’t stick to the rolling pin at this stage or it may rip.
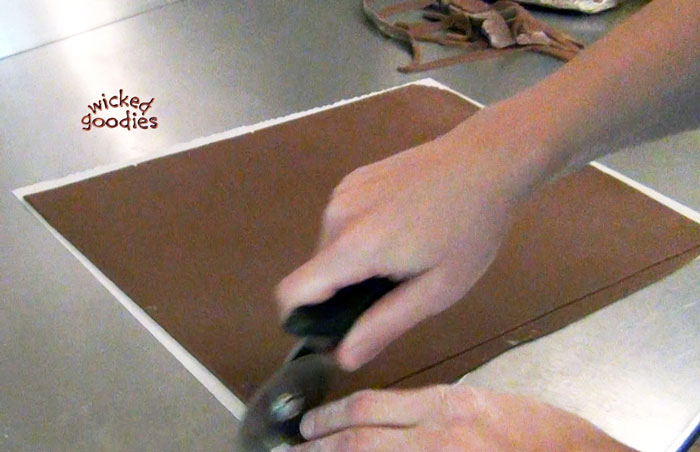
6. Once the dough is evenly rolled out, trim the rough edges, following the line of the parchment paper.
7. Seal the top of the rolled dough with plastic wrap. Slide it onto a cookie sheet or piece of cardboard and put it into the refrigerator for at least one hour. Sheets of rolled dough can be lifted by pinching opposite corners of the parchment paper. However it’s safer to lift and maneuver dough sheets by sliding them into a cool flat surface instead.
8. Roll all of the dough out in this manner and transfer each sheet to the refrigerator as soon as it’s done.
How to Store Rolled Dough Sheets
Dough sheets can be stacked and held in the refrigerator or freezer for several days as long as they are well sealed under plastic wrap.
For longer term storage of rolled dough, omit the parchment paper and sandwich dough sheets directly between two pieces of plastic wrap.
For the best results, allow the rolled dough sheets to rest in the refrigerator for at least a few hours or ideally overnight before cutting and baking shapes.
Reusing Dough Scraps
Dough scraps can be pressed into a ball and reused again. Because second generation dough has been handled more, it has more gluten in it, so whenever possible, allow it to rest in the refrigerator for a day or more before using it again.
Step-by-Step Cutting Instructions
1. Fit the template pieces on top of a pre-rolled dough sheet. Find the best arrangement of parts to maximize the use of each sheet of gingerbread. Don’t press hard on the templates because that may disturb the dough underneath. Only use them as guides, pressing just gently enough to hold them steadily in place while trimming around them. It helps to use a tiny roller cutter for this but larger roller cutters also work well.
If using a knife, don’t drag its blade through the gingerbread dough, as that will pull the shapes out of symmetry. Instead, cut straight down. As long as the dough remains cold, it’s possible to work directly on top of it, tracing templates and cutting out house pieces. Be swift and decisive at this stage.
When working on a lot of small parts that are tedious to cut out, it’s better to slice off just enough dough as is needed and return the rest to the freezer, because when the dough grows warm, templates stick to the gingerbread, which results in torn dough.
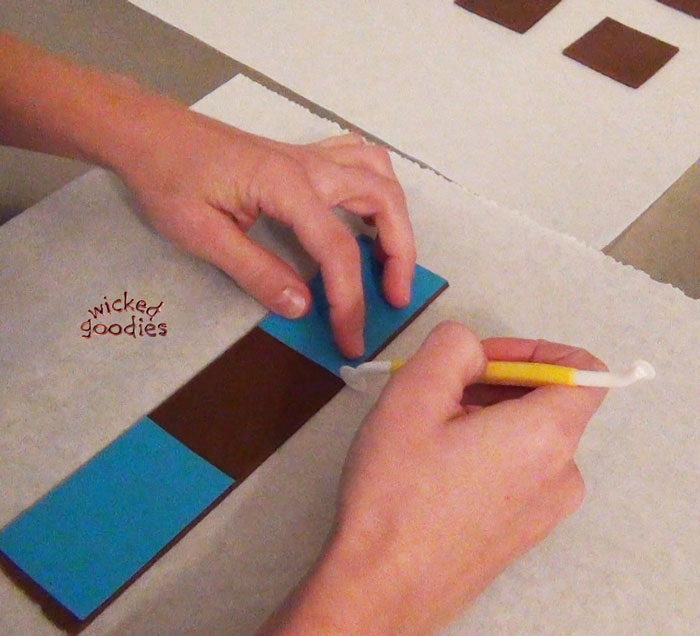
To avoid the problem of torn dough due to templates sticking to it, it’s also possible to trace
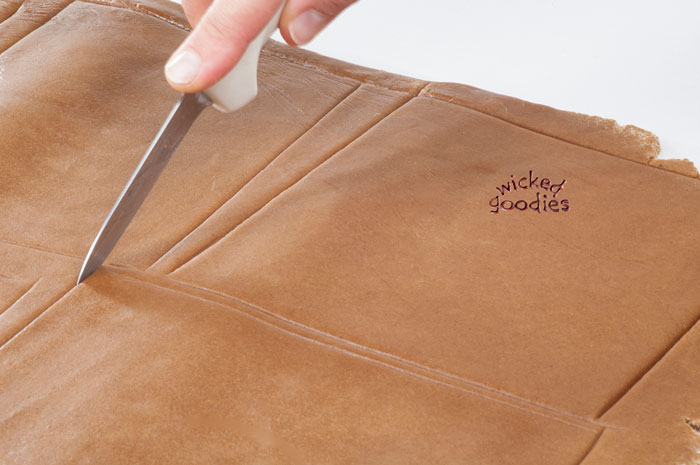
template pieces before removing the plastic wrap from the surface of the gingerbread. Use a butter knife or pointed sculpting implement to trace the outline of each piece. Press into the plastic just enough to leave an impression in the gingerbread all around the template. Allow a small amount of space in between each template so that it’s possible to cut clean lines all around each piece of dough.
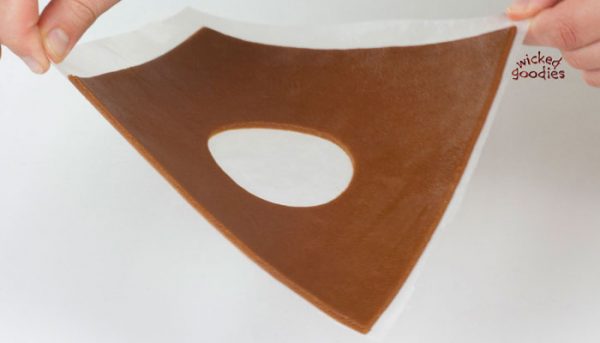
2. Once all the pieces are traced, remove the plastic wrap and use a tiny roller cutter to cut each piece fully.
3. Use a small knife to help trim any tight corners where a roller cutter doesn’t easily fit.
4. Remove the excess dough and press it into a ball for reuse, wrap it in plastic wrap and return it to
the refrigerator. Likewise, return the cut pieces still on the parchment paper to the refrigerator and allow them to chill for at least 20 minutes. Be very careful when handling them as it’s important they don’t get jostled or warped at this stage.
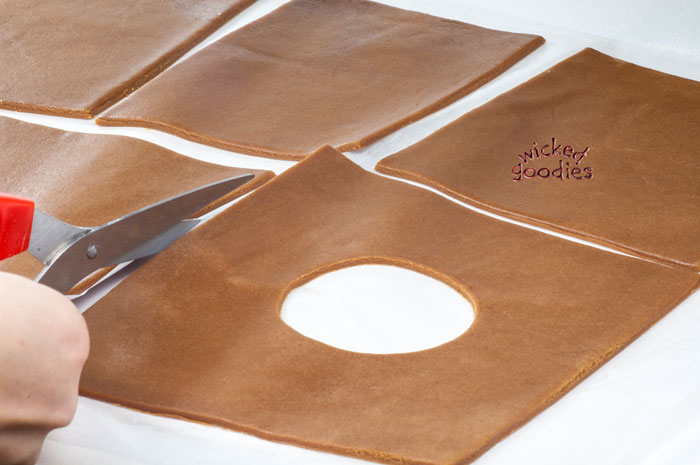
5. Once the dough is firm, with scissors, carefully cut the parchment paper to separate any pieces that are too close together for baking. Handle the cut pieces by picking up their parchment paper liners on diagonal ends or by sliding them by the paper onto a cool cookie sheet or flat piece of cardboard. Don’t lift gingerbread house parts without the parchment beneath. Don’t use a cookie spatula to move them around either. Keeping larger dough pieces on their parchment paper liners from start to finish is the key to maintaining their original shape and dimensions.
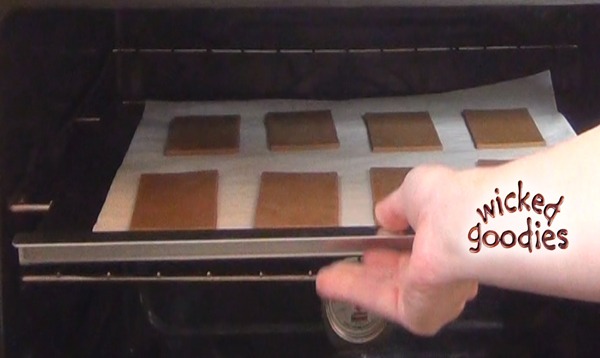
6. Place the gingerbread pieces on a flat sheet pan (I prefer the kind with with only one rim for holding because it makes large pieces easier to slide on and off) and bake them at 325° F (160°C) with at least ½-inch of space between them. Since there is no leavening in this recipe, there shouldn’t be much spreading of the parts during baking, but it’s important to prevent them from knocking against one another when they go into the oven, so allow them ample space.
Baking
VIDEO: Baking – Gingerbread House Series
Preheat the oven to 325° F (160°C). I recommend using an oven thermometer, especially if you own an analog oven since ovens are not always calibrated correctly. This is the best way to be sure the temperature is in the right range. \
Arrange the racks on the top or middle of the oven. In the video, I am working with a gas oven, which gets very hot on the bottom, so I have to bake things like cookies on the top rack. In the past, when using electric ovens, I have found the upper-middle rack to work best. You will have to learn by trial and error which spot in your oven yields the best results.
Once the oven is fully preheated, slide the gingerbread pieces onto a flat sheet pan. I prefer the kind of pan with only one rim because it makes large pieces easier to slide on and off. Bake pieces that are the same or similar size together on the same pan. Avoid mixing different shapes and sizes on the same baking tray. Arrange the pieces with at least ½-inch of space between them. Since there is no leavening in this recipe, there shouldn’t be too much spreading of the dough during baking, but it’s important to provide ample space between parts so they don’t knock against one another when they go into the oven.
Slide the tray into the hot oven and allow the gingerbread house pieces to bake until they begin to darken around the edges. How long this takes will depend on a number of variables.
Variables That Effect Baking Time
- The actual internal temperature of your oven
- The altitude where you live, which affects baking time
- The thickness of your dough
- The temperature of your dough
- The size and shape of your parts
- The orientation of your tray within the oven
- The orientation of each piece on the tray
- Whether or not the pan is already hot
- How many times you open the oven door allowing heat to escape.
Parts that Tend to Bake Faster
- Small pieces
- Thin pieces
- Narrow pieces
- Areas with windows cut out
- Pointed edges
Within your oven, the back and sides are likely to be the hottest areas so parts oriented nearest those walls are likely to darken faster. The least hot part of the oven is the middle part and the side closest to the door. Keep this in mind as you arrange gingerbread house pieces on your tray. If you have an especially narrow or pointy piece, don’t orient it facing the back or sides of the oven. Orient it near the middle or near the door. This will help prevent that point from over-baking.
To ensure even baking, it helps to rotate pans 180 degrees about two thirds of the way through the baking process. If two racks are being used at the same time, it helps to rotate pans from top to bottom as well.
Avoid under-baking gingerbread house pieces or they will be bendy and weak. Under-baked pieces can always be saved by returning them to a 275° F (135 C°) oven for another 10-15 minutes. When it comes to gingerbread house building, it’s better to overbake cookies just slightly so that they are nice and crisp all around. However, it’s important not to overbake too much or the parts can shrink and buckle, so don’t overdo it.
Flipping
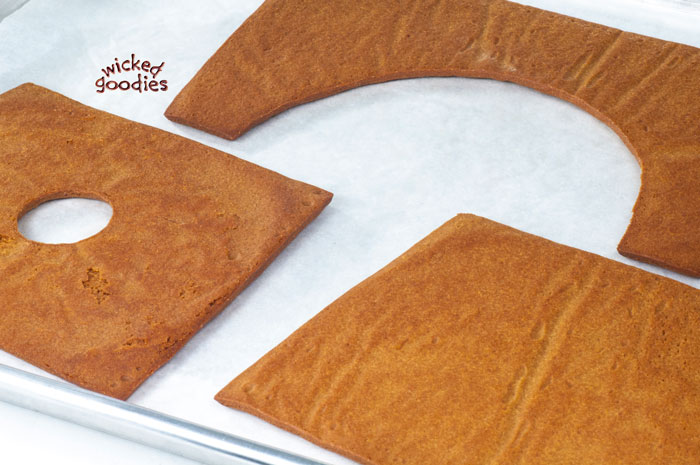
Bigger gingerbread pieces have a tendency to curl a little at the edges when they cool, which can make house assembly more difficult. This happens most often to long, narrow parts and thin parts.
To avoid curling, as soon as a tray of gingerbread is out of the oven, slide the parchment paper off the hot pan and set that pan safely aside. Then immediately flip the baked pieces over onto a cool flat surface that’s covered in parchment paper. Unless they were heavily floured during the rolling stage, freshly-baked gingerbread house parts are usually stuck fast to their parchment paper liners, which makes pieces easy to flip by simply grabbing the paper and turning it over. If not, sandwiching the dough (protected by parchment paper on both top and bottom) between two flat pieces of cardboard can help execute this maneuver. Alternatively, a cookie spatula can be used, or bare hands even if you dare. As long as the gingerbread is just out of the oven, it can tolerate being flipped. Be quick when doing it so as not to break a piece.
Note: Waiting even so much as a few minutes to flip gingerbread house parts after baking will not be as effective in preventing their ends from curling up at the edges.
Embossing and Overlay
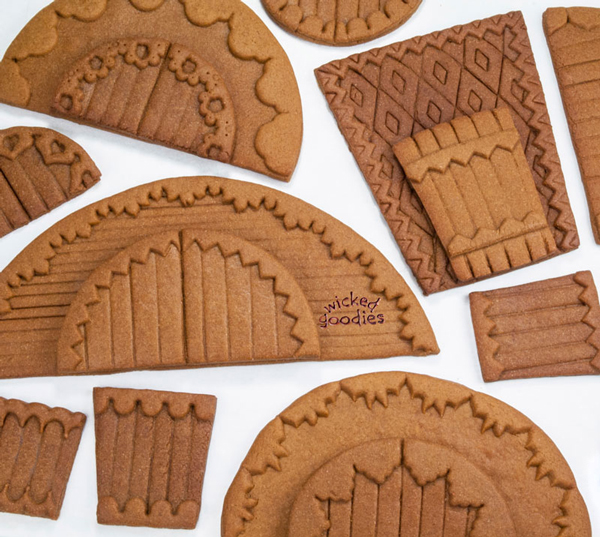
Gingerbread will retain most of the contour that’s etched into it before baking so there are a limitless number of ways to emboss patterns. I often emboss gingerbread house doors with vertical lines to give the impression of wood beams. It’s an easy way to dress up a door.
To emboss patterns into gingerbread house dough, press the side of an offset spatula or the blade of any cookie cutter into the dough until a clear impression is made. Don’t press more than half way through the dough, however, as it’s important to avoid cutting completely through it. Always keep an embossed piece of gingerbread on parchment paper liners because they are more likely to fall apart or bend out of shape if maneuvered by hand. Bake embossed pieces as you would a regular piece. During baking, embossed elements take on darker tones in the indentations, so the pattern becomes more pronounced.
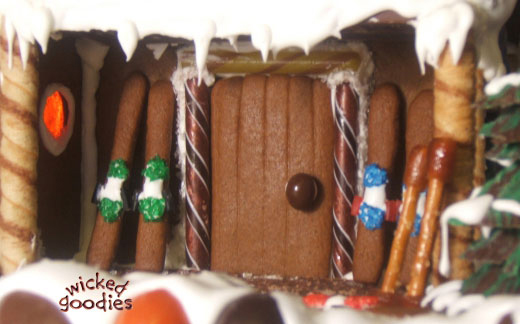
Pieces of gingerbread can also be baked on top of one other to add a 3D effect.
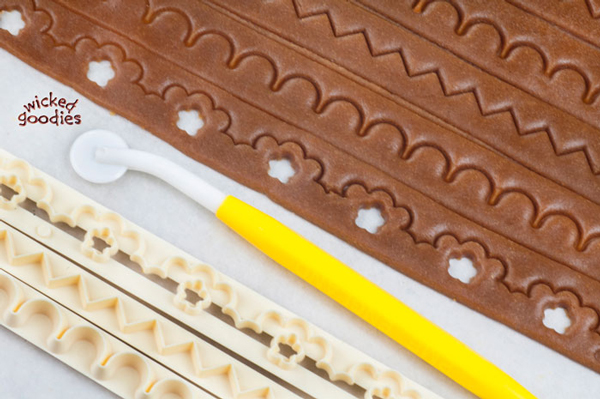
Here are some gingerbread doors and doorways that were both embossed and overlaid with patterned trim. The patterns used to trim the doors and doorways were made with FMM cutters.
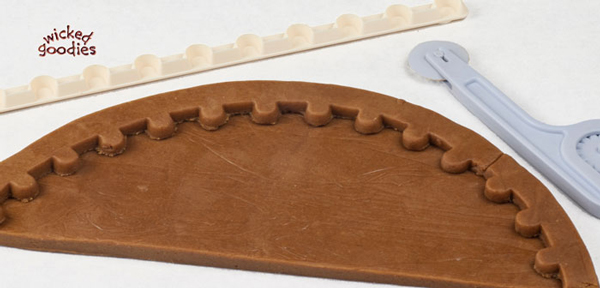
Here are links to the FMM cutters
Note: It’s important to use extra thinly rolled gingerbread in frozen sheets when cutting out strips of trim with FMM cutters.
Gluten 101
The key to preventing gingerbread house shapes from shrinking or warping is to control the amount of gluten that forms in the dough. For this reason, I wish more cookbooks talked about this influential wheat protein, because knowledge of it is fundamental to the baking arts. It’s one of the first things that we learn about in culinary school: not enough gluten equals an unstable dessert whereas too much gluten makes pastries tough and chewy. If you’ve ever made rock hard pie dough or biscuits that were more like hockey pucks, it’s probably because too much gluten was activated within the flour. A skilled baker doesn’t necessarily have to know what gluten is (many who’ve never heard of gluten still know how to deal with it based on feel and intuition) but it helps greatly to understand how it works, especially when it comes to gingerbread house baking, so here’s my explanation. Incidentally, this handy lesson may be applied to any pastry dough that involves flour.

You can’t see gluten with the naked eye but you can definitely spot the signs of it. For instance, when you stretch pizza dough and it springs back into its original shape, that’s gluten in action. Or if you’ve ever knotted a pretzel, that act is made entirely possible by the strength of gluten. You’ve probably appreciated it while tasting fine desserts. A perfectly executed Napoleon (classic French pastry made with layers of flaky puff pastry) for example, means the baker had a light and knowing touch when it came to the gluten.
Things that activate gluten formation in dough
• Moisture (any liquid ingredient in a recipe)
• Heat (including the heat of one’s hands and the average heat of room temperature)
• Mechanical action (like kneading, rolling, or handling)
Gluten is an inert protein until it comes into contact with wet ingredients like eggs, milk, or water. Once activated, it grows within dough like a network of stretchy rubber bands. As dough is mixed and handled, gluten flexes its muscles even more, continuing to toughen until the cookie or pastry is done baking. This is not a bad thing… some gluten is essential in order for dough to hold together. In most cases, gluten is THE primary structural element in the pastry. If we were talking about the human body, gluten would be the bones, muscles, tendons, and ligaments. That’s how important it is in baking, which is why it’s quite hard, nearly impossible in fact, to make a number of desserts without it.
Bread and pasta are two items that benefit from the formation of lots of gluten (that’s why we knead bread so much, because the goal is to form as much gluten as possible) but the opposite is true for dessert pastries including gingerbread house dough. Gingerbread dough needs a delicate touch, as in *just enough* but not too much gluten in order to come out right. Whereas not enough gluten equals a weak dough, too much gluten causes dough to grow dense and stubborn as a rubber band ball, which is not what you want in a cookie. If gingerbread house dough develops too much gluten, on a molecular level, it begins to engage in a tug of war with itself, causing the shapes to shrink and warp in the oven, which means then they won’t fit together as well.
Things that prevent gluten formation in dough
• Refrigeration
• Freezing
• Rest/Time (gluten stops pulling so hard when it has a chance to rest)
• Acid (this is why the liquid ingredient in this recipe is vinegar, not water)
Maintaining a cool environment for gingerbread dough is key to preventing too much gluten formation. Lower temperatures help gluten relax so that it doesn’t fight against the rolling pin or cutting tool. Allow thi dough to chill in the refrigerator between each stage of handling: after it’s made, after it’s rolled out, and once more after it’s been cut to size/before baking. Remember: don’t leave the dough sitting out at room temperature for too long and don’t put it onto a hot sheet pan until the very moment that it’s ready for baking.
Tip: For best results, make this dough recipe in advance so that it can relax in the refrigerator for several days before baking.
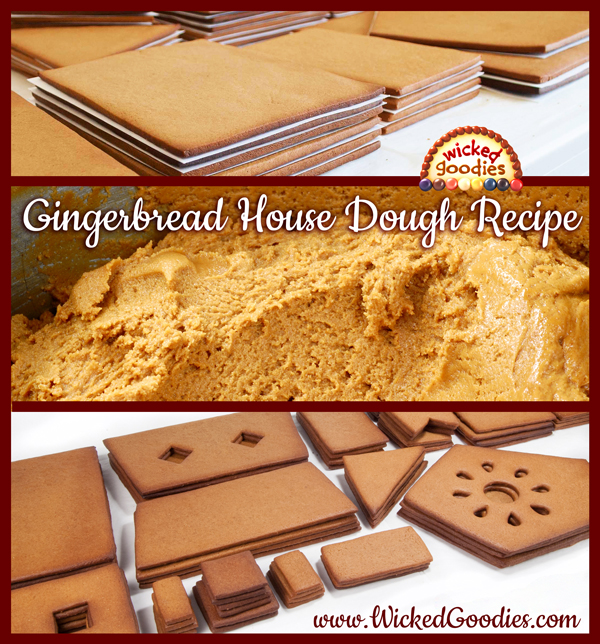
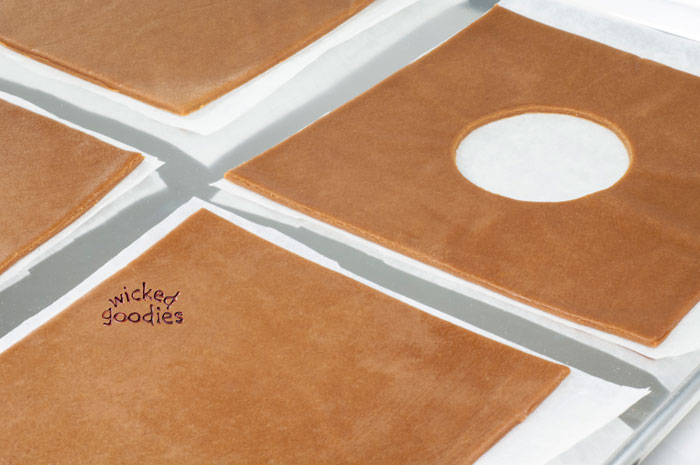
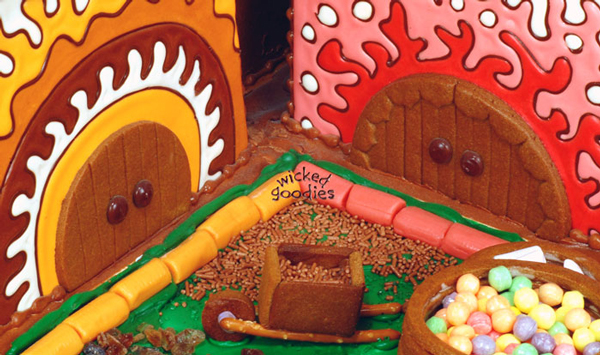
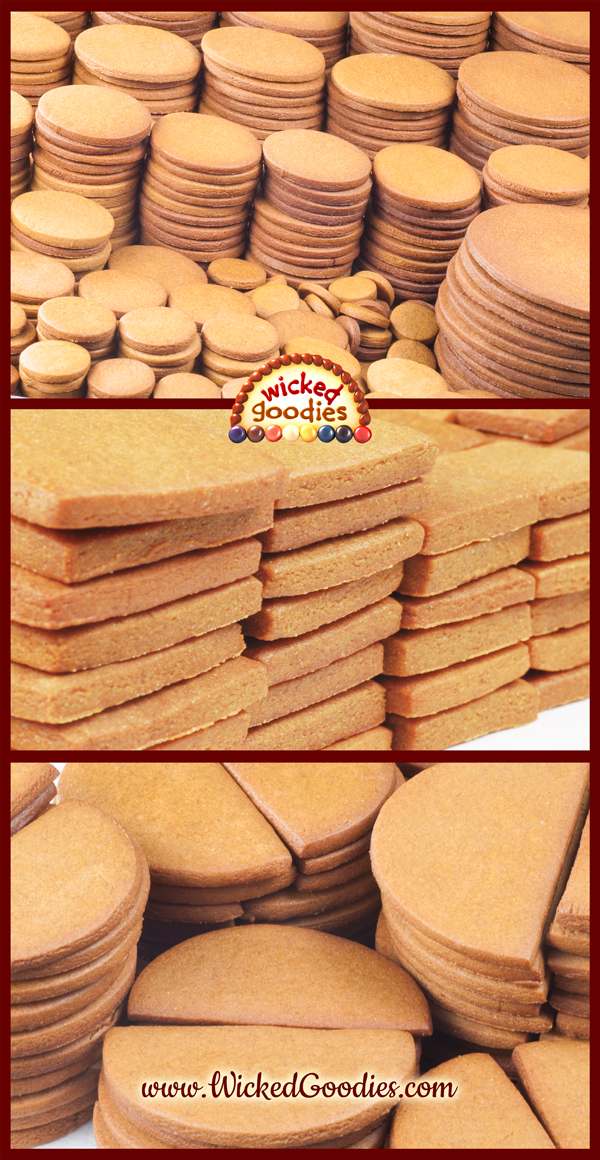
Molasses Color Comparison
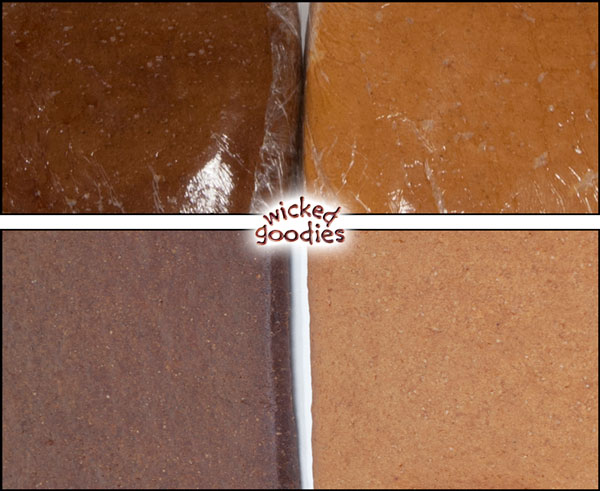
Top: Raw gingerbread house dough sealed in plastic wrap
Bottom: Baked gingerbread house parts
Left: Made with organic molasses.
Right: Made with conventional American Grandma’s brand molasses
Using organic molasses yields a much darker dough than conventional American “Grandma” brand molasses. See the difference in the photos above. Both types of dough are used throughout this book, which is why sometimes the dough looks light and sometimes it looks dark.
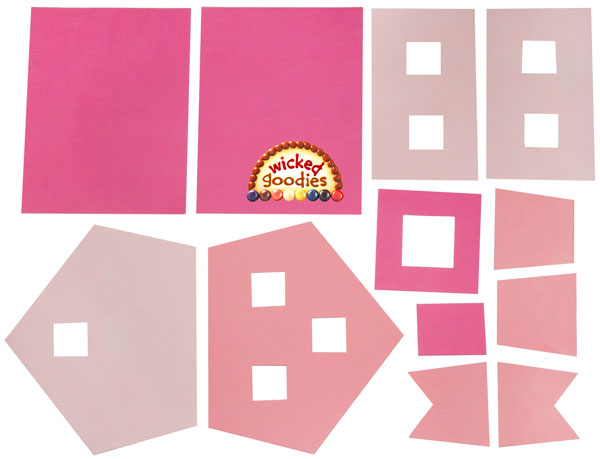
Free Template
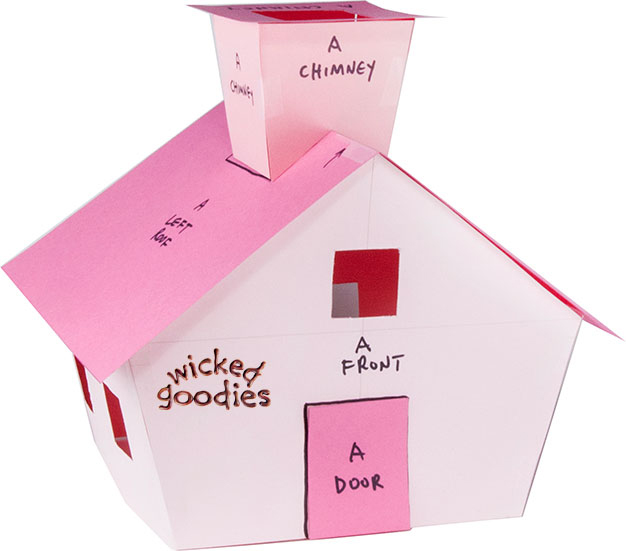
Here is the link to get the FREE PRINTABLE Gingerbread House Template A

New to Wicked Goodies? Start *HERE*


Related Content
Gingerbread House Sealing and Edging 
You might also enjoy
Gingerbread House Decoration and Construction 
Gingerbread House Candy Ideas 
Gingerbread House Windows 5 Ways

fi6ijn
I am making a gingerbread piece for a contest. I have been entering for about ten years. Of course my pieces don’t compare with yours. But I try. I have used various recipes. Just found yours so I decided to use it this year. I have a problem. The dough is so dry it cracks when I roll it. Any suggestions. I did follow the recipe.
The same happened to me? How to fix?
I love doing gingerbread houses I mess up with measuring the peices I am sure things will be a lot more smooth with premeasured templets.
Hi purchase on 12/08 have heard nothing from PayPal or wicked good. Please respond not sure what went wrong. I see a transaction in my bank account say PayPal wicked good “ pending”
I would love to help you. According to my records, it appears that the payment successfully processed and the download link was issued without delay to the email address associated with your paypal account (yours ends in att.net). Unfortunately, I do not have the option to message you via paypal but I just attempted to issue a copy of the book as an email attachment, sent to that same address. It didn’t work. I received the following error message: the address couldn’t be found, or is unable to receive mail. Since this is the only email I have on file under your name, I don’t know how else to reach out to you. Hopefully you will come back to this page and find this reply. If/when you do, please email me from a functional account at mywickedgoodies@gmail.com and I will send your copy of the book ASAP.
Thank you I just sent you an email.
Hi Kristen, I am writing you from Germany: I am orthodotist and me and my staff love to decorate our office for christmas time. Last year we tried to make a giant gingerbread house, but due to our “unprofessional” attempts, it broke…
This year, I had a new project in mind…..like a winter castle – and my staff is amazing and shares my enthusiasm. So I did some research and found your website, bought your gingerbreadhouse books, watched your tutorials and we got started ! We followed ALL of your instructions and I have to say: You did such a fantastic job, all your recepies came out just like you described, the dough is fabulous, we tested and used all different icing consistancies, we even bought the blue painters scotch tape your recommended for assembling – everything is perfectly decribed, we didn´t have ANY failure or problems with anything – your books and tutorials AND your WORK are AWESOME – YOU ARE AWESOME !!!! Thank you for all the high valuable information – I highly recommed everything !!!
Of course our work isn´t as perfect as yours, but it´s our first project and we did it as a team, so we are quite happy with it 🙂
All the best for you !!! And Merry Christmas !!
I LOVE IT SO MUCH! Wow! Wow! Wow! You and your team did an incredible job together. I am so impressed by the size and complexity of your design. I love what you all did with the piping. I see the bricks and can appreciate the tremendous amount of work that went into making them. I see how the top level of the tallest tower flares out – it’s a nice touch!
Nicola, thank you so very much for sharing the photo and for leaving such a nice comment as well. It brought me joy.
You made it into the Hall of Fame: https://www.wickedgoodies.net/gingerbread-house-hall-of-fame/
It’s eggless recipe
The recipe is not eggless.
I have a question, when making up and baking the gingerbread how long does it last and can i freeze the finished product?.
Yes you can definitely freeze the dough. It lasts for a long time, about a week in the refrigerator and at least month in the freezer depending on the efficacy of the freezer and how effectively the dough is sealed. I haven’t ever attempted freezing the baked cookies so I can’t speak to that.
Thank you! How long after baked do they last? Were making them up for a church fundraiser
It depends on the quality of the environment and how thoroughly they are iced (icing seals and preserves the surface of the cookies). Some of my pieces have lasted for years on display. If you intend for your donations to be eaten, they will taste freshest if they are made/donated within the same week. You can extend their shelf life and protect them from the elements by wrapping them in clear cello. A couple of bakeries where I worked packaged their gingerbread houses this way (like how gift baskets are wrapped) and it looked great, showed off the product well.
Thank you so very much!! You have been a great help!
I just purchased your first book and I can’t access it. I mistakenly put my email down wrong
Teresa,
My records show that you have made some download attempts so I assume you found your access in the email account associated with your paypal account, yes? I’m glad that you were able to solve your own issue. Feel free to email me if you are still having technical difficulties.
Muchas gracias por ilustrarnos el paso a paso. Mi inquietud ha sido hacer un nacimiento. Y la verdad se me hacia muy complicado pero con tus pasos, creo poder lograrlo.
quisiera comprar tu e-book. Me seria de mucha ayuda
Kristen your gingerbread work is amazing! I have dabbled in gingerbread making – mostly centerpieces made of gingerbread – but I really want to start making other houses/scenes.
If I get a gift card for Christmas I am so buying your book! Here is a piece I made last year (thank you to Elaine for the tutorial…..
http://blog.elainessweetlife.com/2014/11/gingerbread-nativity-tutorial.html )
It’s marvelous!
Have to say this an awesome book, the amount of info is amazing. I have taken many of the techniques into my general cake decorating as well so it is not just for gingerbread that’s for sure.
Well, over a year since the last post, but I am thrilled to get this book!!! I have made Christmas Gingerbread Houses with the kids for 23 years… the tips in this book will elevate it t a whole new level!!! THANK YOU!!
Bought the book this afternoon, now just waiting for it to be sent to me! Can’t wait 🙂
Bought it! 🙂
Another fantabulous job well done Kristen!!! I just love your work ~ looking forward to more….
Thanks, Shannon! 🙂
Lots of information I really want, but I’d rather have a paper book. When will it be for sale & where? Also, you have a book on modeling clay? Where is that available?
This is the only format currently available on gingerbread houses dough (not sure when the print book will be available) but my modeling chocolate book is in print. You can check it out here: http://www.wickedgoodies.net/cake-decorating-with-modeling-chocolate/
Very Nice Kristen! I just purchased my e-book and am very pleased. Thank you so much for sharing your knowledge.
Thanks for buying my book, Jeanne. I hope you find it helpful and I would love to see any gingerbread house that you make!